Roof Tarp: Your First Line of Defense Against Water Damage
When it comes to protecting your home from water damage, one of the most important measures you can take is to have a roof tarp on hand.
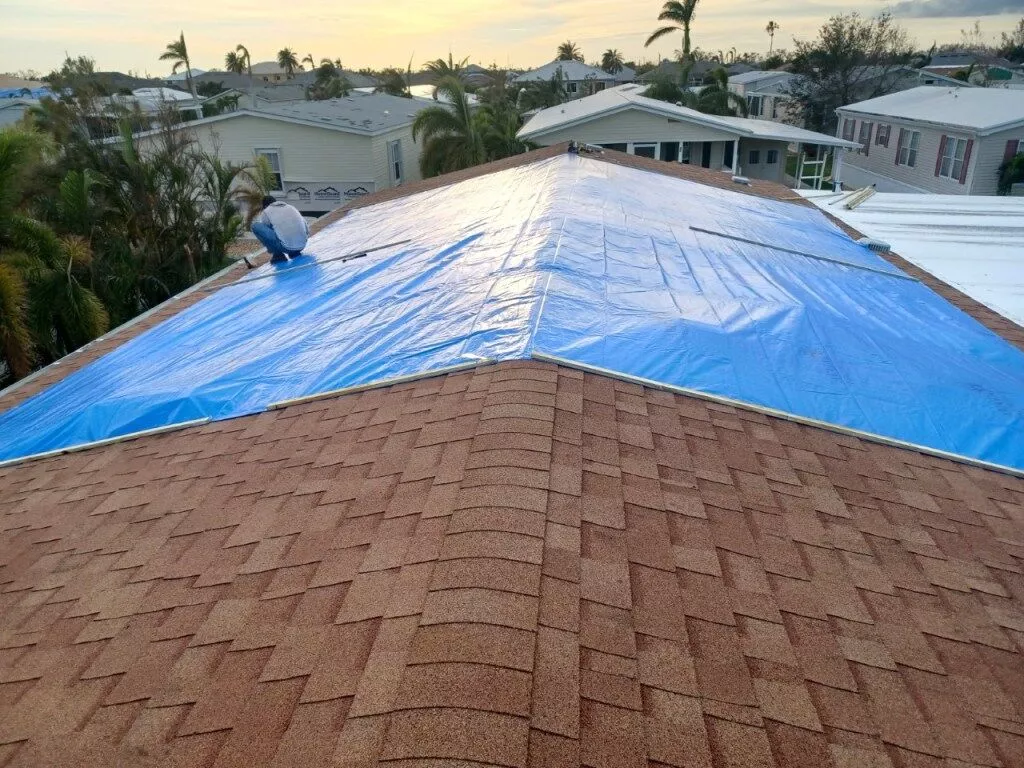
A roof tarp is a temporary covering that can be used to protect your roof and prevent water from leaking into your home during emergency situations such as storms or roof damage.
In this article, we will explore the benefits of using a roof tarp, how to properly install one, and why it should be considered as your first line of defense against water damage.
The Importance of a Roof Tarp
Water damage can cause significant and costly damage to your home. It can lead to mold growth, structural damage, and the deterioration of personal belongings. Having a roof tarp readily available can help mitigate these risks by providing temporary protection until permanent repairs can be made.
Roof tarps are made from durable materials that are designed to withstand harsh weather conditions, including heavy rain, snow, and wind. They are typically made from materials such as polyethylene or polypropylene, which are waterproof and UV-resistant. These materials help to prevent water from seeping through and causing further damage to your home.
Roof tarps are easy to install and can be secured using ropes or bungee cords. They come in a variety of sizes to fit different roof shapes and can be customized to cover specific areas of damage. When properly installed, roof tarps create a barrier that keeps water out and prevents additional moisture from entering your home.
By using a roof tarp, you can protect your home from further water damage while you wait for professional repairs to be completed. This can save you time and money in the long run, as it prevents the need for extensive repairs and the potential for mold growth.
It is important to note that roof tarps are only a temporary solution and should not be used as a permanent fix. They should be used as a temporary measure until permanent repairs can be made. It is recommended to contact a professional roofing contractor to assess the damage and provide a long-term solution.
Installing a Roof Tarp
Installing a roof tarp requires some basic knowledge and preparation. Here are the steps to properly install a roof tarp:
Assess the damage: Before installing a roof tarp, it is essential to assess the extent of the damage to your roof. Identify any areas where there are leaks or missing shingles, as these are the areas that will need to be covered with the tarp.
Gather the necessary materials: To install a roof tarp, you will need a tarp that is large enough to cover the damaged area, as well as a hammer, nails, and a ladder. It is also important to have safety equipment such as gloves and goggles to protect yourself during the installation process.
Secure the ladder: Place the ladder securely against the side of the house, ensuring that it is stable and will not wobble or slip during the installation process. Use caution when climbing the ladder and make sure to maintain three points of contact at all times.
Position the tarp: Carefully position the tarp over the damaged area of the roof, ensuring that it is centered and covers the entire damaged area. If necessary, use bricks or other heavy objects to hold the tarp in place temporarily.
Nail the tarp down: Starting at one corner of the tarp, use a hammer and nails to secure the tarp to the roof. Place a nail approximately every 12 inches along the edges of the tarp, ensuring that it is securely fastened to the roof. Repeat this process for each edge of the tarp, making sure to pull the tarp tight as you go to minimize any sagging or flapping.
Check for leaks: Once the tarp is securely fastened, check for any gaps or areas where water could potentially leak through. Use additional nails or bricks to reinforce these areas and ensure that the tarp is watertight.
Monitor the tarp: After installing the roof tarp, it is important to monitor it regularly for any signs of damage or wear. Heavy rain or wind can cause the tarp to shift or tear, so be prepared to make any necessary repairs or adjustments as needed.
By following these steps and taking the necessary precautions, you can properly install a roof tarp to protect your home from further damage until permanent repairs can be made.
Why a Roof Tarp is Your First Line of Defense
A roof tarp is your first line of defense against water damage because it provides immediate protection for your home. It can be quickly installed, preventing further water intrusion and minimizing the risk of additional damage.
By acting promptly and using a roof tarp, you can buy yourself time to arrange for professional repairs and prevent costly repairs. A roof tarp serves as an effective temporary solution to halt water infiltration and safeguard your property from further harm.
Its simple installation process ensures that it can be deployed swiftly in emergency situations, providing immediate protection for your home. By acting promptly and utilizing a roof tarp, you can effectively minimize the risk of additional water damage, saving yourself from potentially costly repairs in the long run.
This temporary measure gives you the necessary time to arrange for professional repairs, ensuring a thorough and permanent solution to any roofing issues. Don’t underestimate the importance of a roof tarp in preventing further damage and preserving the integrity of your home.
Conclusion
A roof tarp is an essential tool in protecting your home from water damage. By having a roof tarp readily available and knowing how to install it properly, you can minimize the risk of water intrusion and the subsequent damage it can cause. Remember to assess the damage, gather the necessary equipment, measure and cut the tarp, secure it tightly, and check for proper installation. By making a roof tarp your first line of defense, you can safeguard your home and provide yourself with peace of mind during emergency situations.